How to Upload a Picture to Vistaprint Invitation
In this commodity I will discuss how to apply Vistaprint for wedding ceremony stationery, including a site walk-through from first to finish. This beginner's guide will show yous how to create an business relationship with Vistaprint, upload PDF images, and brand sure your Love & Lavender wedding invitation, RSVP, or other printable look great.
Consider using an online printing company if you lot don't have the fourth dimension to impress your wedding stationery at dwelling. You gain more than free fourth dimension for planning your wedding ceremony and making other great DIY projects – yay!
Permit's get started.
Create an Account with Vistaprint
I have used Vistaprint for a few projects, and I know it tin exist overwhelming the first time yous create an business relationship and finally click the buy push on your stationery product.
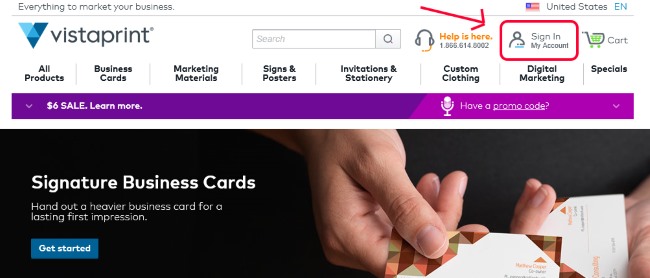
To get started creating a new account click the button labelled "Sign In/My Account" at the top of Vistaprint'southward website.
Make full in the standard form fields like email, first and last name, and choose a secure password.
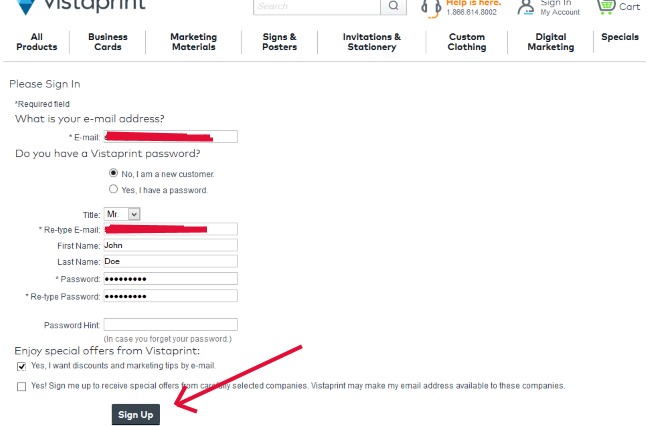
You will notice the option 'Yes, I want discounts and marketing tips by east-mail.' I suggest leaving it checked, or if you uncheck the box a new option will appear that says 'receive emails once a calendar week'. Some companies tin overwhelm your email inbox with offers, so once a week may be more than appropriate. Either way, it is a good way to receive the latest discounts directly in your inbox.
Click the Sign Up button and you are on your style. You will immediately exist taken to your business relationship page – the hub for navigating around Vistaprint.
Upload a PDF File to Vistaprint
You should have already created a printable using one of our online forms or downloadable PDF files. Perhaps you take a PDF file that bought somewhere else online or were able to find for gratis. In any case, remember where you stored this design file on your computer because you will demand to access information technology for this step.
In this case, we are going to upload the Love & Lavender silhouette hymeneals invitation sized at 5 10 seven inches.
(click through the slideshow below)
Steps Corresponding to Slides Higher up:
- Navigate to the Invitations & Stationery tab and click on Wedding Invitations.
- Ringlet Downward to hymeneals invitations and click Get Started.
- Click Apply your complete pattern and click the radio button 5×7 Flat.
- This will bring up a layout option. In virtually cases you will choose vertical layout and click continue.
- To upload your paradigm click the Browse button
- Navigate to the folder where you lot saved your PDF file and select the file. Click Open up.
That's information technology! You should see the words Upload Complete – Your paradigm resolution is excellent.
Click on the push labelled Side by side in order to go on to the customization screen.
Customize Your Printable
I sometimes forget that not anybody is as familiar with online editing tools. That's why I want to attempt and brand it as simple as possible for you to follow along step-by-pace as I become through the editing process. Let's see how we can make sure yous get the correct quality from your Vistaprint product.
At this point y'all should come across the customization screen below, with your printable blueprint in the middle of the screen and common editing functions (basic, text, insert, advanced) above the pattern.

We will explore the additional 'request a proof' selection in the adjacent section.
Commencement, allow'southward wait at what nosotros need to do to ensure our printable is correct.
Discover the dotted line on the inside of the case silhouette paradigm to a higher place – that is called the safety line. When Vistaprint goes to print and cutting your final invitations, they want to make sure that cypher important is Outside this line. In our case, the letters Thousand and Due east from the groom's proper noun falls exterior the dotted line.
What should we do? We demand to slightly ingather the prototype then that it falls with the margin of error for cut. Hover your mouse over the paradigm and a new tool box will appear. Click on Crop/Rotate to bring up the Crop/Rotate dialog box equally pictured below.
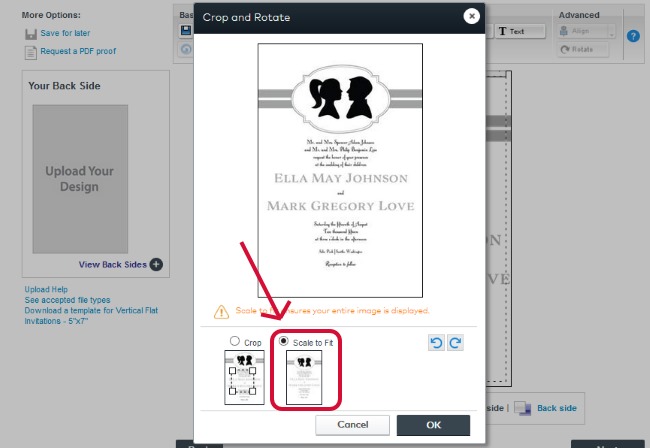
In this case we need to select Scale to Fit so that the image is shrunk down to fit inside the cut marks. Click the OK push button.
At present when you return to your printable invitation you volition observe that the text falls inside the rubber line. Trouble solved!
In that location are other options yous tin play effectually with including adding an image, additional text, or adding a back side blueprint to make your PDF printable double sided. I won't become into these functions now and will salvage that for another article. Click NEXT and move on to the customize back side screen.
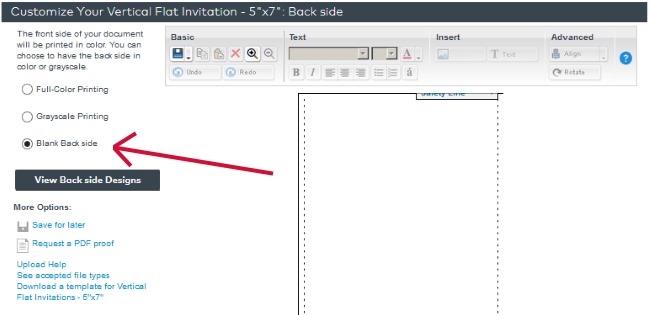
I simply select Blank Dorsum side (above), every bit I don't want to have anything on the dorsum for this instance wedding invitation. Again, feel free to add a dorsum side if you adopt.
Request A PDF Proof
Before nosotros click next and motility on to the review role in Vistaprint I desire to take a 2d to highlight the Request a PDF Proof choice. You will find only below the Blank Dorsum side radio button is a link to Request a PDF proof. Click that link.
A dialog box pops up in the center of your screen that reads, "You'll receive a PDF proof of your design to review. Nosotros will alert you lot by email when your proof is ready. PDF proofs are bachelor at no additional charge." But click OK and wait for the PDF proof to be created.
Eventually you lot volition get to the screen below where yous tin click to open a copy of your PDF document with the watermark 'PROOF'.
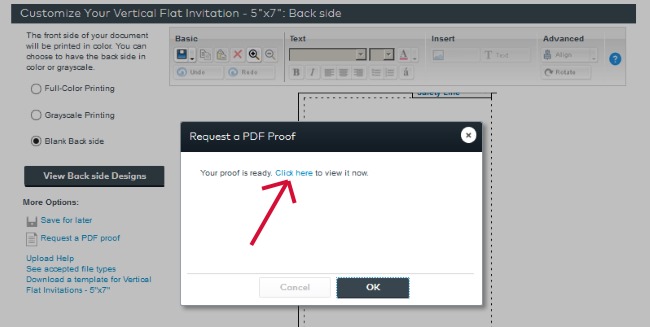
We are finished with our online proof so let's click OK and then Side by side to motility on to the review function.
Review Your Design
The terminal step before payment is to review your blueprint and make sure it looks the way you desire. Vistaprint reminds you to check your design and make sure:
- Information is accurate and spelled correctly
- Text is legible and contrasts against background
- Images are articulate and not blurry
- Naught is besides close to the margins
Nosotros have already done the online proof, then we can check the box that says, "Online Proof Approval I have checked for the higher up issues and approve my blueprint."
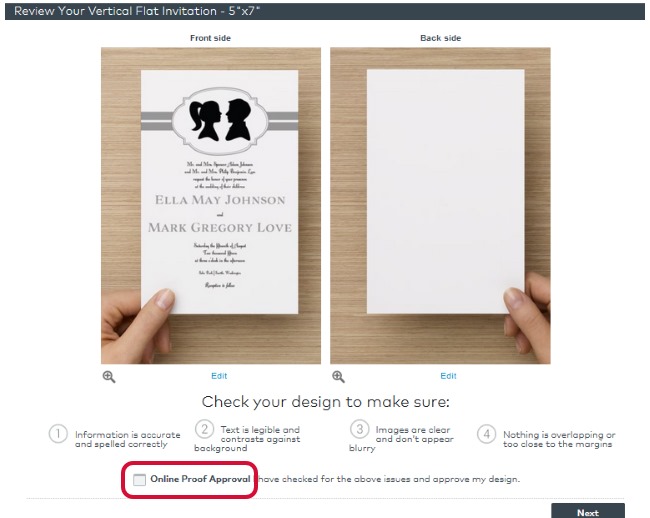
I consummate my final review and everything looks good in my example silhouette invitation. Time for the checkout procedure.
Checkout Process
Step I: Complete Your Order
Quantity – As you lot can meet from the three slides below, I'm going with a quantity of 100 for my invitations and received a dainty discount.
Paper Stock – I chose the included matte finish for this invitation. Upgrade prices are reasonable if you prefer a thicker and heavier weight paper or sleeky paper type. Click the link Which stock is right for me? for a good comparison chart outlining each newspaper type.
Envelopes – Lastly, I picked the complimentary white envelopes. They are a standard thin envelopes, not the best option if y'all envision an elegant stationery gear up mailed to your guests. For invitations in particular I would propose ordering envelopes from somewhere else.
Stride Two: Recommended For Y'all
Some of the recommended products are actually a bit funny. I couldn't imagine getting a large car door magnet and having my nuptials invitation plastered on the side of my car for all to see! However, y'all may want to browse and add a little something extra to your cart. I love my forenoon coffee, maybe a java mug might non be a bad idea after all.
Click NEXT and yous are at the concluding screen. I promise!
Stride Three: Checkout
The My Cart folio provides a terminal overview of all the options and extras you selected in the guide to a higher place. In this case you can see I have my example 100 matte terminate silhouette invitations with free white envelopes. Your final checkout overview folio volition likely wait different than mine.
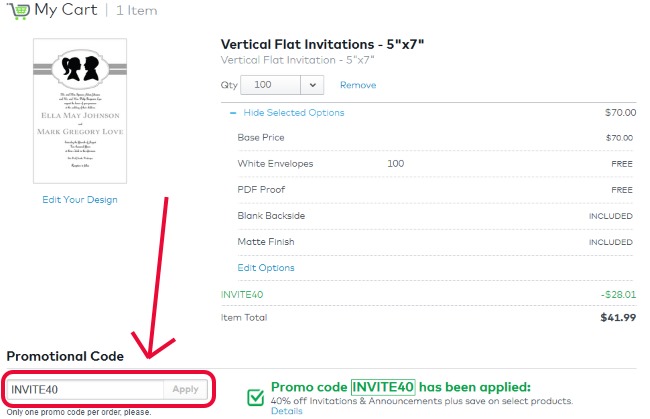
Promotional Code
Don't forget to add together a promotional code if i is not already applied. There is always some sort of sale or deal from Vistaprint, like this one where you tin can get forty% off Invitations and Announcements. If you signed up for their newsletter in the inital business relationship registration, then you likely accept a promo code waiting in your email inbox.
Phew! Nosotros made it to checkout, good job! It seems similar a lot of screens to get to the end, but some are non applicable and you can hands move forwards to finish ordering your wedding stationery.
I think you can accept it from here. Most people I know take experience completing an online transaction, and Vistaprint's checkout process is no different: cull your shipping option, enter your contact details, payment details, and then finalize your order.
I promise this tutorial has shown you lot how to you can use Vistaprint to upload a printable file and create your wedding stationery.

Meredith
Despite her dreamy wedding blogger lifestyle, Meredith's day job is running ClassicVeils.com and a full-time mom to an active toddler. If she could, Meredith would spend her days taking cruises, helping animals in demand, and watching Big Brother!
Source: https://www.loveandlavender.com/vistaprint-wedding-stationery-guide/
Post a Comment for "How to Upload a Picture to Vistaprint Invitation"